How To Test Electrical & Electronics Components using a Multimeter?
Testing Electrical and Electronics Components and Devices using Digital and Analog Multimeter
Troubleshooting Electronic & Electrical Components using a Multimeter
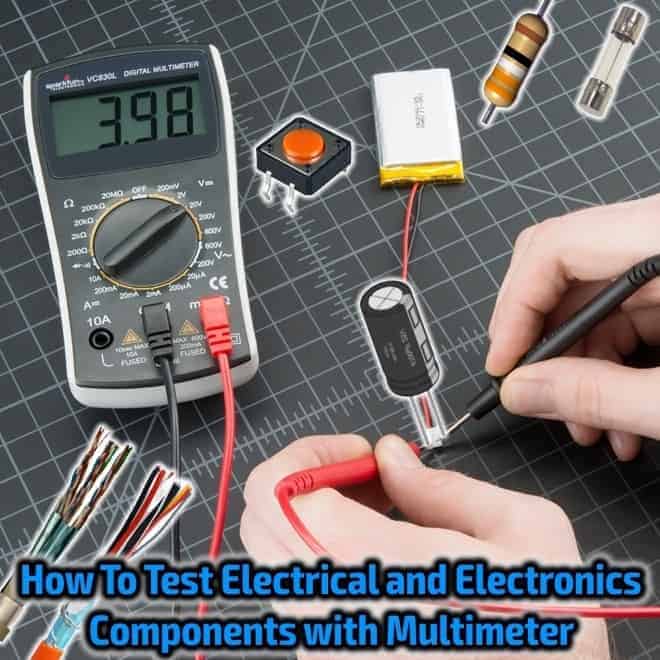
We all know the role and importance of “Troubleshooting, Maintenance and Repairing” in Electrical and Electronics Engineering. Most EE components and elements used in Electrical and Electronics equipment, devices and instruments are common in their functions and operations. In this article, we will show how to check different components and devices using a multimeter (DMM and AMM).
To be a good analyzer, troubleshooter and repairer, you must know the following basic techniques and have good skills in Electrical and Electronics troubleshooting, design and analyzing electric / electronic circuits. For this purpose, we have started a multimeter tutorial where we will use DMM (Digital Multimeter) and AVO Meter (Ampere-Voltage-Resistance Meter) or Multimeter (Digital/Analog) to test different electrical / electronics devices, instruments and components to find their terminals and condition such as are are they short, open, good or faulty.
In this basic multimeter tutorial, We will use digital and analog multimeter to check the following electrical and electronic components, devices, tools and instruments:
- Cable and Wires
- Switch/Push Buttons
- Fuse
- Capacitors & Inductors
- Resistors & Burnt resistors
- Diodes and LED
- Battery
- Transistors
- Relays
In troubleshooting, we use different kinds of basic Electrical and Electronics Engineering Tools but the main and important tool is Multimeter. Let’s see how to test different electrical and electronic components and devices using digital and analog multimeters.
Cable and Wires
To check if the cable and wires are in good condition or broken before sizing the proper cable & wire for Electrical Wiring installation, we perform the continuity test. For this purpose, take AVO meter (or Digital Multimeter) and select “Resistance” (in AVO meter…Rotate the knob to the “Ω” or Resistance).
Now connect both terminals, i.e. both naked ends of the cable/wire with the AVO or Digital Multimeter Terminals. If the meter reading shown “0 Ω”, it means Cable/Wire is in “Good Condition”. On the other hand, if meter reading is “Infinite”, it shows the cable/wire may be defective or broken. So you need to replace it with a new one.
Switch/Push Buttons
Use the same method (mentioned above for checking the cable and wires)…to perform this method correctly, you will need to apply this method in both cases (ON & OFF positions) on switches and push buttons…In other words, first apply this method on switches/push buttons and then “Push” the push button and perform the same method again.
In the first attempt, if the meter reading is “Zero” and in the second attempt, the meter reading is infinite, it means the Switch/Push button is in good condition. If Multimeter reading is “Zero” or “infinite” in both attempts, it means the switch is in short circuit or continuity connection is broken and you should replace it with a new one.
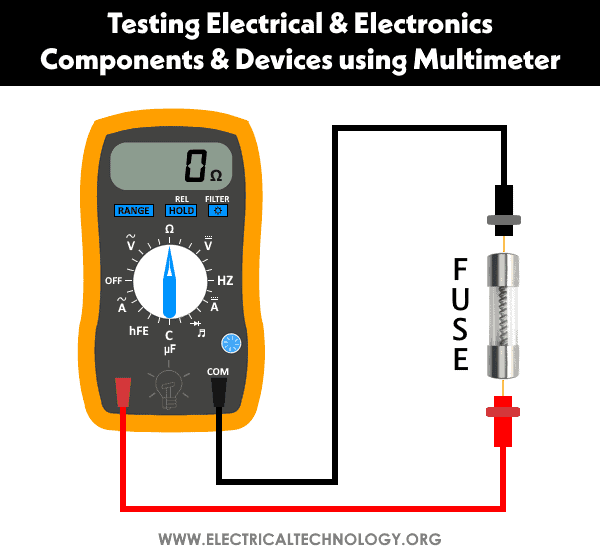
Fuse
To verify Fuse condition, i.e. is “Fuse” in good condition or damaged? … We perform the same method I.e. continuity test as mentioned above. In short, if the meter reading is “Zero” it means Fuse is in good condition. If Multimeter reading is infinite, it means Fuse continuity may be broken or blown. So you should replace it with a new one immediately.
Capacitor
We have already discussed the topic “How to check & test a capacitor using a digital (multimeter) and analog (AVO meter)? – By eight (8) methods with pictorial views.
In this tutorial, you can check and test using a Digital Multimeter or AVO meter if the Capacitor is Good, Short or Open?
Diode & LED
We have updated a detailed post about “How to Test a Diode using Digital & Analog Multimeter?” by four methods. In this multimeter tutorial, we have shown different things about diodes such as using diode mode in DMM and resistance mode in DMM and AMM to identify the terminals of Diode, LED and Zener diode. In addition, you may also check if the diode is good, bad, short or open.
Transistor
In another detailed multimeter tutorial about “How to Check a Transistor by Multimeter (DMM+AVO)?” you may find the Base, Collector and Emitter of a transistor by using Digital and analog multimeter. Also, There is an easy method to remember the direction of NPN and PNP transistors. In short, in this tutorial, You will be able to use the multimeter in resistance mode (Digital + Analog multimeter) or hFE / Beta mode (Only DMM) to test a transistor if it is good, faulty, short or open.
Battery
In the basic test meter tutorial about “How to test a battery using a test meter?” you will be able to find if the battery is in good condition, charged, needs to be charged, low charge / current, high charge / current or is it faulty and needs to be replaced with a new one.
Resistor & Burnt Resistors
To check if the Resistor is in good condition or broken, we use a multimeter. For this purpose, take AVO meter (or Digital Multimeter) and select “Resistance” (in AVO meter…Rotate the knob to the “Ω” or Resistance). Now connect both ends of the resistor with the AVO or Digital Multimeter Terminals. If the meter reading shows the exact value of resistance or with a percentage tolerance, it means Resistor in “Good Condition”.
For Example, 1kΩ = 1000Ω with a 5% tolerance will show the reading near about 950Ω to 1050Ω. On the other hand, if meter reading is “Infinite”, it shows the Resistor may be defective or broken and open. So you need to replace it with a new one (exact value).
Good to know:
You can also check the value of a burnt resistor using a digital or analog multimeter by the following three handy methods.
Relay Coils & SSR Relay
To test an SSR (Solid state relay) and electromechanical relay coils by using a multimeter, You will have to follow the detailed and step by step guide about “How to Test a Relay? Checking SSR & Coil Relays?“.
Measuring Electrical Quantities Using Multimeter
Voltage
In the very first measuring tutorial posted as “How to Measure Voltage using Digital and Analog Multimeter?“, you will know how to know the value of eclectic potential or voltage using analog or digital multimeter.
Current
In the second measuring tutorial named as “How to Measure Current using Digital and Analog Multimeter?” you will learn how to measure the amount of electric current using a digital or analog multimeter.
Power
In the detailed post about How to Measure Power using Digital and Analog Multimeter? You can find and measure the amount of electric power using DMM and AMM. The basic procedure is to measure both voltage and current and multiply to get the value of power.
Resistance
Measuring resistance via multimeter has been step by step described in the post of How to Measure Resistance using Digital & Analog Multimeter?
Frequency
You may check the detailed post about How to Measure Frequency using a Multimeter? In this post, you will be able to measure the frequency of a circuit using digital and analog multimeters.
Capacitance
In our previous tutorial under the title of “How to Measure Capacitance using a Multimeter?” you can find the value of capacitance of a capacitor using a multimeter in both the basic and capacitance mode.
General Precaution
- Disconnect the power source before checking, servicing, repairing or installing electrical equipment and devices.
- Always, Select the higher value in Digital or analog Multimeter, and then, gradually reduce it to the proper valve.
- Never try to work on electricity without proper guidance and care
- Read all the instructions and cautions and follow them strictly.
- The author will not be liable for any losses, injuries, or damages from the display or use of this information or try any circuit in the wrong format so please! Be careful because it’s all about electricity and electricity is too dangerous
Note: This basic multimeter tutorial has to be updated with a new testing method using DMM + AMM for additional EE components and devices … Stay tuned.
Related Tutorials:
- How to Find The Suitable Size of Cable & Wire for Electrical Wiring Installation?
- How to Perform the Continuity Test using a Multimeter?
- How to Calculate the Value of Resistor for LEDs Circuits?
- How to Test & Fix the Printed Circuit Board (PCB) Defects?
- How to Calculate the Battery Charging Time & Battery Charging Current? – Example
- How to Find Voltage & Ampere Rating of Switch, Plug, Outlet & Receptacle?
- How to Find the Number of Outlets on a Single Circuit Breaker?
- How to Find the Proper Size of Circuit Breaker? Breaker Calculator & Examples.
- How to Calculate the Right Size Battery? Battery Bank Size Calculator
- How to Size a Load Center, Panelboards and Distribution Board?
- How to Determine the Number of Circuit Breakers in a Panel Board?
- How to Determine the Right Size Capacity of a Subpanel?
- How Much Watts Solar Panel Do You Need for Home Appliances?
- How to Determine the Suitable Size of Inverter for Home Appliances?
- How to Calculate the Right Size of a Solar Charge Controller?
- How to Size a Single Phase and Three Phase Transformer in kVA? Calculator.
- How to Calculate the Right Size Battery? Battery Bank Size Calculator.


Thanks for this post.Its really very knowledgeable on as well helpful post for electronics hobbyist and electronics engineering students. They can easily get the idea regarding to electrical or electronic components.
Hello Annalisa,
I also agree with you, this post teaches me a lot especially to measure proper electric voltage.
can u email me how to test electronic components pdf please my email is (tarimanwest@gmail.com)
Dear Sir,
I am interested to learn more about what you are offering and your newsetter online weekly will help me a lot.
Dear Sir / Madam It was very interesting to learn from your site about various electrical tests as of continuity, electrical components and many other. Working as instructor and expert in basic training for aviation technicians, I compiled various training manuals for my students. Now being in quarantine I stated modification of some and find very interesting material on your site. The question is could I use some pictures and texts from your site modifying compilation of module 7.7 Electrical Wiring Interconnection System (EWIS)? Of course, the site electricaltechnology.org will be explicitly mentioned. Truly yours Prof. Dr. Viktoras Bolotinas Kazimieras Simonavicius University http://www.ksu.lt
Thank you. You are most welcome to do so. Best wishes.
Dear Sir/Madam
My high-fi when I plug it turns on and off , please tell me what to fix.
I need to test my LG radio it gives me problems for me to play it I have to switch it on and off several times before it can play,
maybe you can assist me what could be the problem
Thanks a lot Sir