Apps - SoftwareBasic ElectronicsCommunicationControlElectrical DesignElectrical ProjectElectronics Engineering ProjectHow ToLED
Arduino PWM Programming and its functions in Arduino
Arduino PWM Programming and its functions in Arduino
What is PWM?
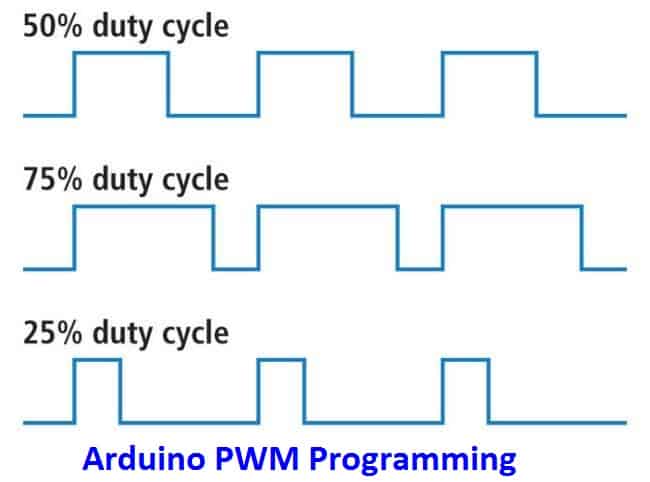
PWM stands for “Pulse Width Modulation”. This technique is widely used in almost all devices in which voltage variation is required. In PWM, steady DC Voltage is converted into square wave with varying pulse width and the ratio of the total time period (T) of the wave to the time of the “ON” pulse width is called Duty Cycle. This technique is also known as Pulse Duration Technique (PDT). Modern Electronics power switches like Mosfets, transistors are required for PWM, and some time, very sophisticated electronics circuit is required when PWM signals have to carry a very high load.
Why PWM?
Major use of PWM is in Power control by varying the duty cycle of the pulse, the amount of power delivered can be controlled. Someone may think that we can limit the power flow by using resistances, then why people prefer using PWM technique? Yes! They think right! We can control power flow by using a simple resistor, but in this way, lots of power will be lost and system will be very inefficient. Also, when we have to control a large amount of power, then the price of the resistors would be more than the whole PWM system for the same power rating system.
Another widely used PWM technique is in conveying information which is embedded in the duty cycle of the wave. For example, if a wave has a duty cycle of 25% and we design a system that make a decision on the basis of the duty cycle of the incoming wave than this PWM single can be used for conveying information as well as controlling the power flow. We use this PWM technique in many devices to convey information and power.
Uses of PWM Technique:
- 1) Servo motor
In this servo motor the rotational angle depend upon the incoming wave duty cycle. - PWM is used in RGB leds to make different colors from three basic colors
- PWM is used in DC-DC convertors where we have to limit the power flow in an efficient way.
- PWM is used in controlling the speed of the Motors.
- PWM is sometimes used in sinusoidal singles to control the voltage levels.
PWM frequency effect:
PWM is basically a varying duty cycle square wave and we have to give attention to its frequency. Motor speed control is a good example to explain and understand the concept. if the frequency of the PWM (which controlling the speed of the motor ) is very low, then the motor will jerk because PWM is infect pulse and if one pulse comes after a long time (after the previous pulse) then the motor will start to slow down (and will go to very low level) and no smooth operation will be seen. So, frequency selection should be taken by keeping in mind the mecnical time contact of the device which you are going to control.
PWM function in Arduino:
As we have already mentioned that, aurdinu coding saves a lot of time as compared to the other platforms where design has to build each and everything from the scratch for PWM with built-in function.
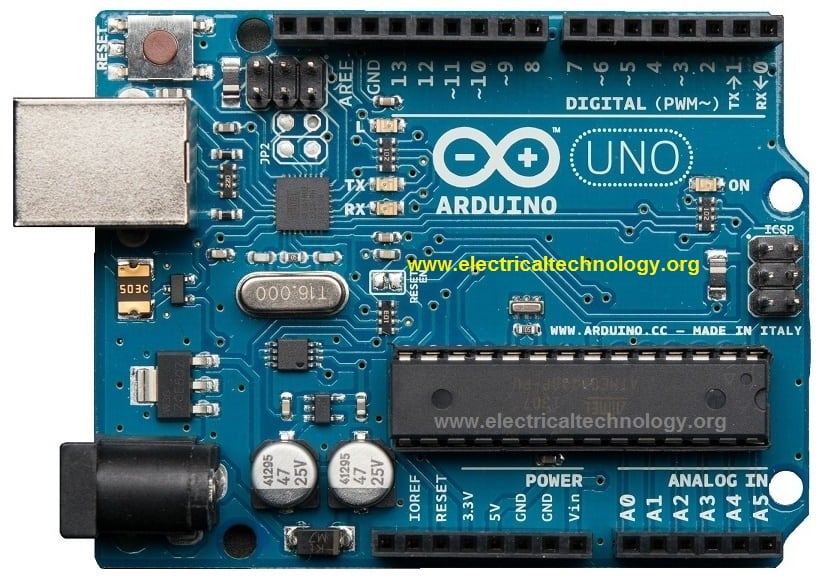
You can see pin 3 on the below Arduino UNO board. This is PWM Pin, which connect the LED between PWM Pin (PIN 3) and ground by using a 120 ohm resistor.
You can see pin 3 on the below Arduino UNO board. This is PWM Pin, which connect the LED between PWM Pin (PIN 3) and ground by using a 120 ohm resistor.
Now there is no need to make any sophisticated functions for PWM output. Just set an appropriate value between 0-255 to this pin and PWM of the specified value would be generated. For digital systems, we use digitalwrite(x,y) function to set the led pin “HIGH” or “LOW”, but now , we will use analogWrite(x,y) because PWM emulate analog signal.
Arduino Programming of PWM:

In the above coding program, Led_brightness define the brightness of LED. We set it as zero initially, and increment it by 50 as we know analogWrtie(x,y) can accept more than 255 value so when the brightness level reached at 255, we make it zero.
So this is the simple way of using PWM in Arduino. Just make sure the correct use of pin and analogWrite() function.
So this is the simple way of using PWM in Arduino. Just make sure the correct use of pin and analogWrite() function.
You Might Also Read:
- How to Program PIC18 Microcontroller. Step by Step Tutorial.
- MAX232: Construction, Operation, Types and Application.
- 10+ Design & Simulation Tools for Electrical/Electronics Engineers Online.
- 15 Must Have Android Apps for Electrical & Electronics Engineers & Students.
- Clap Switch Circuit Electronic Project Using 555 Timer.
- How to find The value of Burnt Resistor ( By three handy Methods ).


hello. thanks for the great post here, am a E.E.E 1st year student and am interested in knowing how to program a led advertisement board. please shed some light on how to start and recommend some tutorials for the led boards development. i will appreciate your sincere reply
Hello,
Can I also use this Arduino PWM for controlling my miniature trains, taking into account that this circuit must work for 2 directions of travel, either forwards or backwards, and how should I program, control and connect it to my rails with speed control, thanks in advance and hoping for good news soon.