What is Arduino and How to Program it? – Arduino Programming
Arduino Programming: What is Arduino and How to Program it?
What is Arduino?
An Arduino is an open source hardware platform with built in programming support. No additional hardware or software (e.g. Hex burner) is required to transfer your programs (i.e. hex file) to the Arduin0. There are all the necessary peripherals attached for the basic operation. It is based on simple AVR microcontrollers.
Arduino is a growing industry nowadays and the major reason behind it is the vast majority of libraries. Users don’t have to invent the wheel again. Long traditional codes have been reduced to few lines now. it is easy to use and enhance productivity. Arduino can be used to make a variety of projects taking analogue as well as digital inputs and can easily interface with different hardware like switches, encoders, Sensors, Motors, relays and many more.
Arduino board PCB designs and schematics are freely available on internet community and blogs and it can also be purchased from the respective sellers and its Integrated Development Environment is free to download, different versions of this IDE are available to make it compatible with different OS (Operating systems) like Mac, windows, etc.
Click image to enlarge

- What is Raspberry Pi? Creating Projects using Raspberry Pi
- How to Program PIC18 Microcontroller in C. Step by Step Tutorial
Why to choose Arduino?
1) Arduino has it’s built in programmer to burn the Hex file in it, for most of the beginners, it is very irritating to buy Microcontroller and Burner separately and sometimes it is very annoying , when poor hardware has a little hidden broken wire and you will waste plenty of precious hours.
2) Its open source so the whole word developer constantly working on its upgrade and fixing its bugs, so its support is readily available worldwide.
3) The largest number of libraries is freely available so person does not need to write a lot of basic code to make the things run.
4) Arduino support many different shields, which can be attached to the basic Arduino board with male to female Headers. It reduces the traditional wiring and chances of errors are less. It is also space and power efficient.
These all the above features are generally not available with single stand-alone microcontroller. That’s why Arduino is loved by the hobbyist as well as professionals.
- Arduino PWM Programming and its functions in Arduino
- Arduino Serial: Serial Communication by Arduino
Types of Arduino :
Arduino has many boards it starts from basic Arduino UNO and goes to Arduino mega, ArduinoFio, lily pad so on and so forth.
- Arduino UNO
- Arduino Mega
- Arduino Duemilanove
- Arduino FIo
- Lily Pad Arduino
- Aurdino Extreme V2
And many other boards.
Features of Arduino UNO
Arduino UNO salient features are:
- Microcontroller (MCU) ATmega328
- Operating Voltage (DC) 5V
- Input Supply Voltage (External ) 6-20VDC (MAX)
- Recommended Input Supply Voltage (DC) 7-12V
- Number of Digital Input / Output (I/O) Pins 14
- PWM (Pulse Width Modulation) outputs 6 (Pin 3, 5, 6,9,10 and 11)
- Input Pins (Analog) 6 (A0-A5)
- DC Current (Max) 40 mA (per I/O Pin)
- DC Current for 3.3V Pin 50 mA
- Flash Memory 32 KB (ATmega328) ( 0.5 KB used by boot-loader)
- Clock Speed (Ceramic Resonator) 16 MHz
- SRAM (Memory) 2 KB (ATmega328 MCU)
- EEPROM (Memory) 1 KB (ATmega328 MCU)
Related Post: How To Design a PCB (Step by Step & Pictorial Views)
Arduino Programming – Step by Step
Programming Aurdino (First program)
Let’s start with Arduino UNO its simple enough to start with, it is based on Atmega 328 Microcontroller
Now start with Arduino First basic program.
Download the Arduino IDE from www.arduino.cc, install it and then double click on the software icon to run.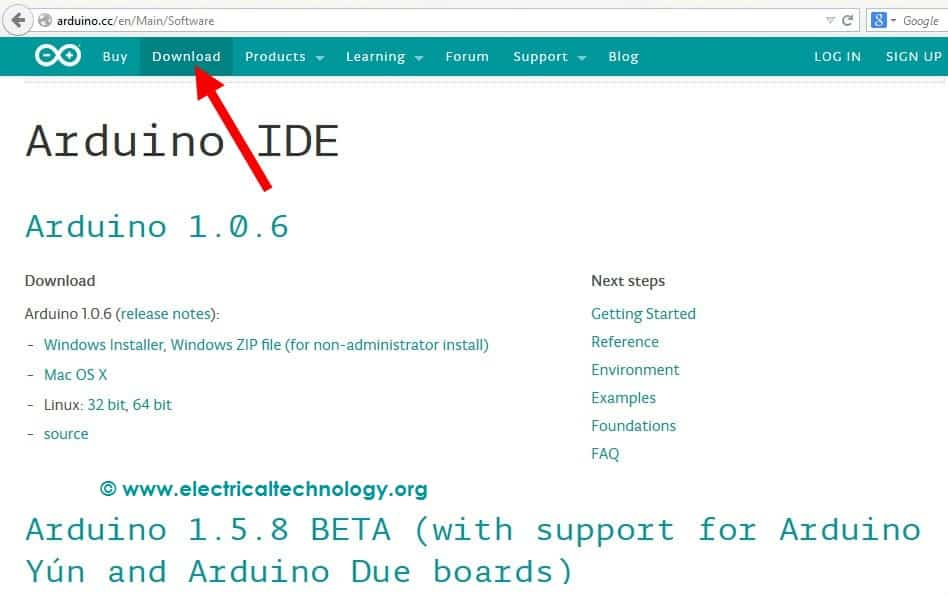 Basics Arduino Programming :
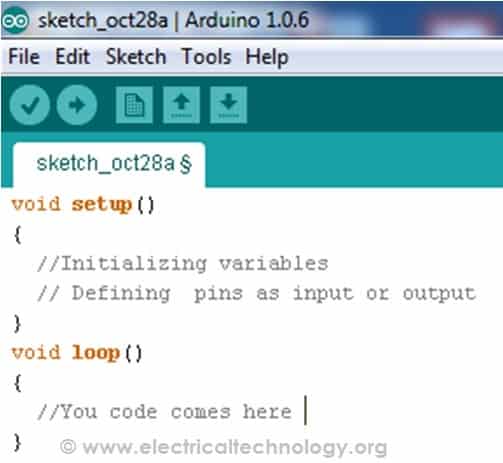
Arduino coding has two major blocks. One of them is called void setup and the other one is void loop. In void setup, we define that which pin should be input and output. It is used to initialize variables and start using libraries.
Second block of the code is void loop. It contains all the code and logics placed within the brackets (it will repeat endlessly).
Let’s write this bare minimum code:
Do not forget to select the appropriate board.

Once the board is selected now start writing the code for this specific board.
Functions Code of Arduino Programing
A few basic functions of Arduino Programming to remember:
Defining Pins:
This syntax is used while assigning a specific name to the pins of ardunio.
Int LED = 13;
Here 13 is the pin number and LED is the new name of that pin now we can access the same pin with both names .
PinMode(x,y) function:
We want to write the code to blink the led. PinMode (X, Y) function: this function takes 2 arguments
1) Pin name or number (X)
2) Defines as output or input (y)
Example: pinMode(led,OUPUT)
The above statement defines Led as output.
digitalWrite(x,y) function:
This function Write Digital 1 or 0 to the pin defined in the arguments of this function. This function also takes 2 arguments
- Pin number or name
- Whether writing “Low” or “High”
Example:
Digitalwrite(Led,HIGH)
The above statement will write +5 volts on the pin named LED.
Delay Function:
This is a built in function of Arduino IDE. It has only one argument i.e. it gives delay in milliseconds.
Example:
Delay(1000);
Then this function will give us delay of 1000 milliseconds.
Final LED Program: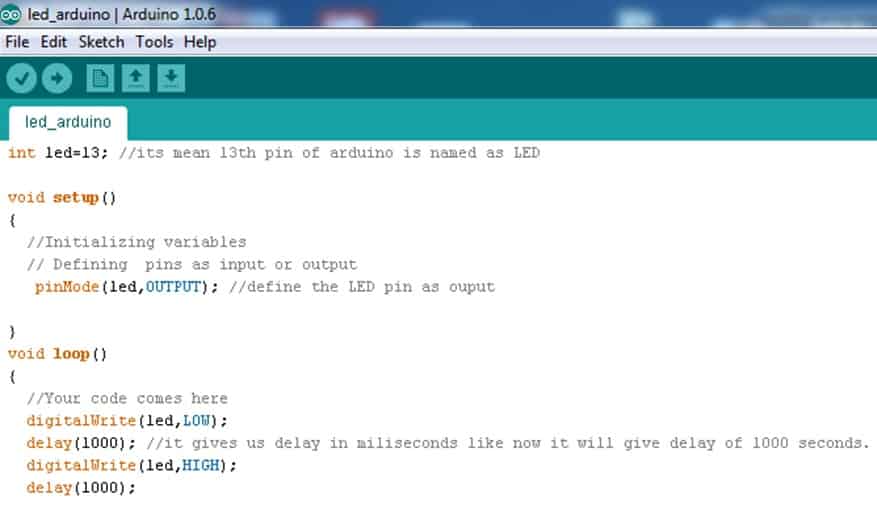 Now click on the button (as shown in the above image) to load the program to the Arduino board. you have done :)
 Stay tune for more updates tutorials like this one.
You may also read


Tout est bien ici et les publication
There is an error in this comment
// it gives us delay in milliseconds like now it will give delay of 1000 seconds
it should be
// …. 1000 milliseconds
or
// … 1 second
Hey dude, you have done a great job for us. You have explained a great topic.
Thank you.
I can say your efforts for this blogis worthfull. great job. keep going, keep givivng us such great informations.Thanks a lot. The informations are very useful for me.