How to Wire and Use Tesla Gen 3 Mobile Connector Charger
Installation and Applications of Tesla Generation 3 Mobile Connector (Portable & Corded) with NEMA Outlets to Charge Tesla and Other EVs
Tesla Gen 3 Mobile Connector
The Tesla Gen 3 Mobile Connector is a portable EVSE (electric vehicle supply equipment) designed for charging Tesla vehicles from standard North American electrical outlets. It supports both 120V (Level 1) and 240V (Level 2) charging by simply changing the outlet adapter. Unlike a permanently installed (hardwired) wall charger, the Mobile Connector can be used at home, while traveling, or anywhere a compatible outlet is available. The charging current is automatically determined by the installed adapter, helping protect both the charging equipment and the branch circuit.
The Gen 3 Mobile Connector is compatible with Tesla vehicles equipped with the North American Charging Standard (NACS) charging port (excluding the original Tesla Roadster). Depending on the adapter used, it can deliver charging power from approximately 1.3 kW to 7.6 kW, making it suitable for everything from overnight charging on a household receptacle to significantly faster charging from a dedicated 240V circuit.
Unlike hardwired EV charging stations, the Mobile Connector requires no permanent installation. However, the electrical outlet supplying the charger must be installed correctly, properly grounded, and protected by an appropriately sized branch circuit in accordance with applicable electrical codes.
Electrical Ratings & Specifications
- Name: Tesla Gen 3 Mobile Connector for Level 1 & Level 2 EV Charging
- Voltage: 100-240V AC – 60 Hz – Single-Phase
- Breaker Rating: 15A, 20A, 30A & 40A
- Charging Current: 12A, 16A, 24A & 32A.
- Output Power: Max. 7.6kW at 32A – 240V
- Charging Speed (est.): up to ~30 miles of range per hour
- GFCI : Integrated 20 mA CCID
- Wire Size: For plug-in installation – Built-in outlet and adaptors with connector cable are used based on current rating.
- Connector Type: SAE J3400 – NACS Connector (Tesla-style) – Compatible with J1772 if used with approved J3400 to J1772 adapters
- Adapters: NEMA 5-20 adapter, NEMA 5-20 outlet adapter, NEMA 14-50 adapter – Supports Tesla PowerShare
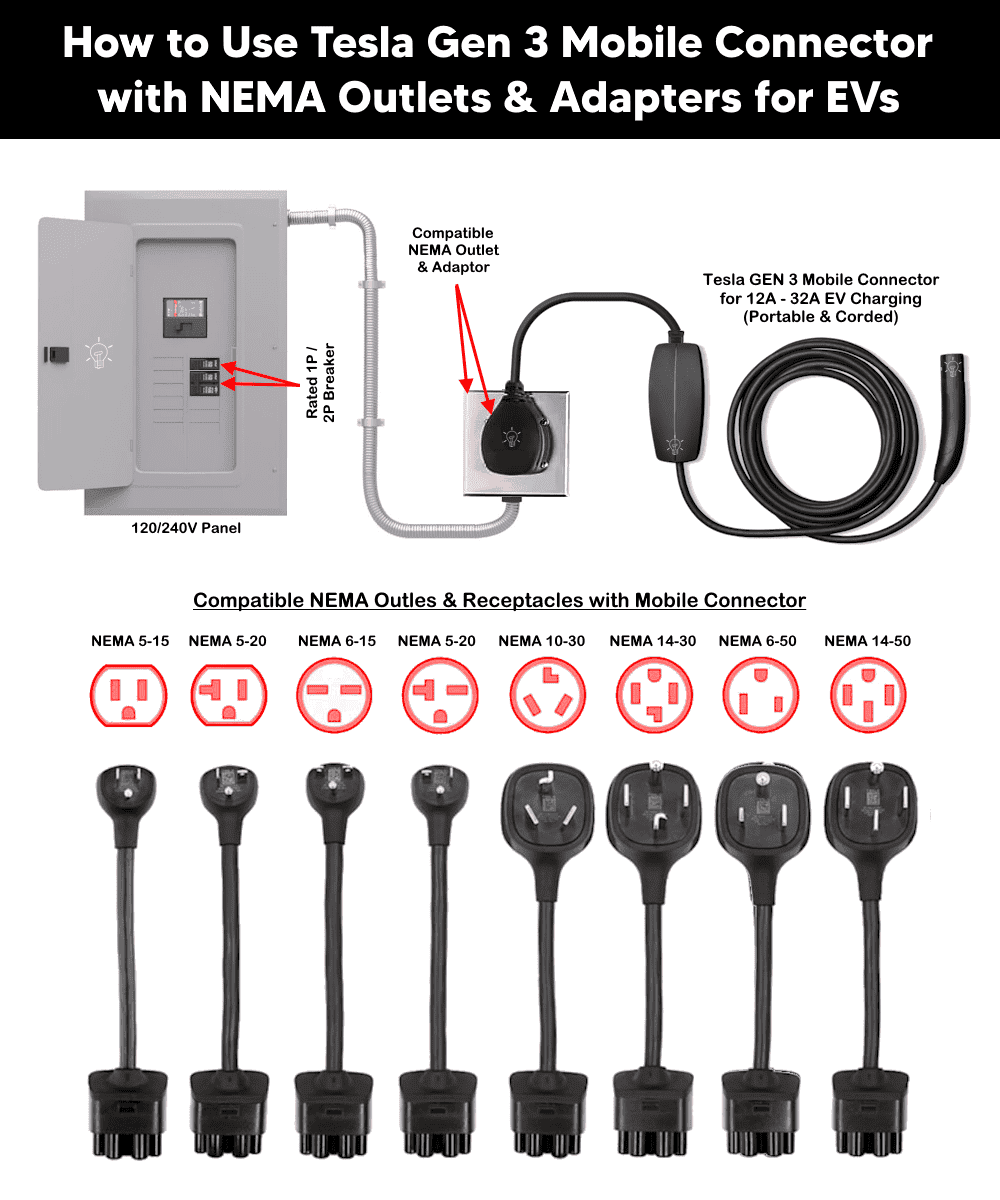
- Compatible NEMA Outlets: 5-15, 5-20, 6-15, 6-20, 10-30, 14-30, 6-50 & 14-50
- Charging Cable: 6 m (20ft)
- Wiring Method: Plug-in
- Mounting: Portable.
- Enclosure: 4x rated for Indoor / Outdoor Mounting
NEMA Adapters / Outlets with Circuit Rating, Max Load & Charging Range
The mobile connector supports multiple outlet adapters. Each adapter automatically informs the controller of the maximum safe charging current. In other words, charging current is automatically limited by the installed adapter.
The circuit breaker rating determines the maximum charging current that the EV charger can safely use through a particular outlet. According to the NEC continuous load requirements (NEC 210.19(A)(1) and 625.41/625.42), an EV charger must not draw more than 80% of the circuit breaker’s rated current during continuous operation. In other words, the circuit breaker must be rated at least 125% of the charger’s continuous load.
The following table shows the NEMA outlets and adapters, wire size, breaker size, charging current, output power and estimated charging range per hour for Gen 3 mobile charger at 120V or 240V AC supply.
| NEMA Adapter / Outlet | Voltage | Breaker Rating | Wire Size | Max Charging Current | Max Charging Power | Est. Range/Hour |
| NEMA 5-15 | 120V | 15A | 14 AWG | 12A | 1.3 kW | ~3 mi/hr |
| NEMA 5-20 | 120V | 20A | 12 AWG | 16A | 1.7 kW | ~4 mi/hr |
| NEMA 6-15 | 240V | 15A | 14 AWG | 12A | 2.8 kW | ~7 mi/hr |
| NEMA 6-20 | 240V | 20A | 12 AWG | 16A | 3.8 kW | ~10 mi/hr |
| NEMA 6-30 / NEMA 10-30** | 240V | 30A | 10 AWG | 24A | 5.7 kW | ~14 mi/hr |
| NEMA 14-30 | 240V | 30A | 10 AWG | 24A | 5.7 kW | ~14 mi/hr |
| NEMA 6-50 | 240V | *40/†50A | *8/†6 AWG | 32A | 7.6 kW | ~30 mi/hr |
| NEMA 14-50 | 240V | *40/†50A | *8/†6 AWG | 32A | 7.6 kW | ~30 mi/hr |
| Tesla Outlet Adapter (PowerShare) | 120V Output | 15A/20A | 14/12 AWG | Up to 20A device draw | Up to 2.4 kW | … |
Good to Know: *If only used for 32A EV charging. † For other types of loads supplied by 50A /breaker/outlets. The copper wire sizes for branch circuit conductors with protection are based on NEC Table 310.16.
** Since 2-wire non-grounding receptacles are no longer permitted for new installations, NEC 406.4(D)(2) and 250.130(C) allow their replacement with GFCI or a grounding-type receptacle protected by a GFCI such as NEMA 6-30 or NEMA 14-30.
The Mobile Connector on a NEMA 14-50 outlet (32A max) is best suited for travel, backup, and situations where a hardwired unit isn’t practical. For daily home charging, use a dedicated Wall Connector (up to 48A hardwired) instead of portable and corded mobile connector chargers.
Existing / New Outlet Installation
The Tesla Gen 3 Mobile Connector is a portable, cord-and-plug EVSE, meaning it does not require hardwiring. Instead, the electrical installation involves wiring the correct NEMA receptacle to a dedicated branch circuit protected by a properly sized circuit breaker in accordance with NEC Article 625.
The charger can be plugged into any existing of the following compatible outlets:
- Standard 15A/20A, 120V household duplex outlet (supports Level 1 charging)
- 15A/20A, 120V outlets and receptacles
- 30A dryer outlet
- RV/range-style outlet (Tesla’s recommended outlet for full-rate home charging)
- Welder outlet (supports the Mobile Connector’s full 32A charging capacity)
If you need to install a new outlet, follow the appropriate wiring installation guide for the outlet type compatible with Mobile Connector charger below.
- How to Wire a NEMA 5-15, 15A – 120V Outlet/Receptacle
- How to Wire a NEMA 5-20, 20A – 120V Outlet/Receptacle
- How to Wire a NEMA 6-15, 15A – 240V Outlet/Receptacle
- How to Wire a NEMA 6-20, 20A – 240V Outlet/Receptacle
- How to Wire a NEMA 6-30, 30A – 240V Receptacle
- How to Wire a NEMA 10-30, 30A – 240V Receptacle
- How to Wire a NEMA 14-30, 30A – 125/250V Receptacle
- How to Wire a NEMA 6-50, 50A – 240V Receptacle
- How to Wire a NEMA 14-50, 50A – 125/250V Receptacle
Good to Know: All outlet and circuit installation work should be performed by a licensed electrician per NEC/ANSI-NFPA 70 Article 625 and local code. The Mobile Connector automatically senses its attached adapter and limits current accordingly – the installer’s job is to ensure the receptacle, breaker, and conductors are correctly rated and grounded for the outlet type chosen.
Good to Know:
Install a dedicated branch circuit whenever possible. For high amperage, use a industrial-grade, heavy-duty receptacle designed for continuous loads such as using EV rated NEMA 14-50 instead of standard NEMA 14-50 receptacle.
Note 1: A 240V receptacle provides significantly faster charging than a standard 120V household outlet.
Note 2: The Mobile Connector automatically detects the installed adapter and configures the maximum allowable charging current.
NEMA 10-30 (is an older receptacle) does not include an equipment grounding conductor. It should only be used where permitted by applicable electrical codes and with the appropriate Tesla adapter. Instead, use NEMA 6-30 with proper grounding.
Note 3: Tesla recommends leaving the Mobile Connector plugged into the wall outlet between normal daily charging sessions to reduce wear on the receptacle.
Never use an extension cord, power strip, multi-plug adapter, conversion plug, or multi-outlet adapter with the Mobile Connector.
Charging Your Tesla EV via Gen 3 Mobile Connector
Before connecting the Mobile Connector:
- Verify the outlet type and select the matching Tesla outlet adapter i.e. NEMA 5-20 Adapter with NEMA 5-20 receptacle and so on.
- Align the adapter with the Mobile Connector controller and push firmly until it clicks into place.
The Mobile Connector automatically recognizes the installed adapter and sets the appropriate charging current.
To charge the EV via connector and adapter, follow the following steps:
- Verify and confirm that the installed adapter matches the receptacle. Never force an adapter into an incompatible outlet.
- Insert the Mobile Connector completely into the receptacle. The plug should fit tightly without excessive movement.
- For Tesla vehicles, open the charge port by pressing the button on the charging handle / charger port (in Park). Alternatively, use the vehicle touchscreen, Tesla mobile App, a voice command or key fob (where equipped).
- Insert the NACS connector fully into the vehicle’s charge port. Charging begins automatically after communication between the vehicle and the Mobile Connector is established. During normal charging, Vehicle displays charging information i.e. Charge port and mobile connector LED blinks green.
- Once charging is complete, Unlock the vehicle and press & hold the button on the charging handle. Wait until the charge port indicator turns white. Now, remove the connector and allow the charge port door to close automatically (or close it manually if necessary).
Charging Other EVs via Tesla Mobile Connector
The Gen 3 Mobile Connector’s vehicle-side handle is a NACS (North American Charging Standard) plug. On its own, the Mobile Connector cannot plug into a vehicle that only has a J1772 charge port.
Many owners of other electric vehicle (EV) brands want to take advantage of Tesla’s versatile Gen 3 Mobile Connector to charge their non-Tesla vehicles.
The common question is: Can you use the Tesla Gen 3 Mobile Connector with a J1772 adapter to charge other EVs, such as Ford, Rivian, Kia, Toyota, Honda, Hyundai, Nissan, Chevrolet, and other J1772-equipped electric vehicles?
The Tesla Gen 3 Mobile Connector can be used to charge many non-Tesla electric vehicles equipped with a SAE J1772 (Type 1) charging inlet by using a compatible NACS-to-J1772 charging adapter. This allows the Mobile Connector to function as a portable Level 1 or Level 2 AC EV charger for a wide range of battery-electric vehicles (BEVs) and plug-in hybrid electric vehicles (PHEVs).
The NACS-to-J1772 adapter (connector-to-connector adapter that plugs onto the Mobile Connector’s NACS handle and provides a standard J1772 inlet on the other end) acts as an interface between the Tesla North American Charging Standard (NACS) connector and the vehicle’s J1772 charging port. It passes the AC charging power and communication signals between the Mobile Connector and the vehicle but does not increase the charging power or change the charging voltage.
The charging rate is still determined by the installed Tesla outlet adapter, the available branch circuit, and the onboard charger of the vehicle.
Good to Know:
Tesla’s Mobile Connector is designed only for charging a NACS-compatible battery electric vehicle, including Tesla vehicles (except the Tesla Roadster).
These NACS-to-J1772 adapters are third-party products (e.g., from Lectron, Tesla-Tap and similar EV-accessory brands) – Tesla does not manufacture or officially endorse a NACS-to-J1772 adapter for this direction of use.
This applies only to AC charging using the Tesla Gen 3 Mobile Connector. It does not apply to Tesla Superchargers or other DC fast chargers.
The adapter simply changes the connector interface; it does not convert voltage, frequency, or charging level.
Good to Know: The reverse scenario i.e. a Tesla vehicle needing to charge from a J1772 public charging station is handled by Tesla’s own factory-supplied NACS-to-J1772 adapter (known as “J1772 Adapter”), which is a Tesla-supported product.
Using the Tesla Outlet Adapter (PowerShare)
Certain Tesla vehicles support PowerShare, which allows the Mobile Connector to supply power from the vehicle’s high-voltage battery to external devices (such as tire inflator air compressor) when used with the Tesla Outlet Adapter.
To use PowerShare:
- Confirm your vehicle and software support the feature.
- Attach the Tesla Outlet Adapter to the Mobile Connector.
- Connect the Mobile Connector to the vehicle’s charge port.
- Plug the external device into the Tesla Outlet Adapter.
- Enable PowerShare from the vehicle touchscreen or Tesla mobile app.
When PowerShare is active, the Mobile Connector’s LEDs stream green away from the vehicle. PowerShare will not start if the vehicle’s high-voltage battery state of charge is below 5%.
Good to Know: Only the Gen 3 Mobile Connector supports Powershare functionality. Do not attempt to use the Tesla Outlet Adapter with other Tesla charging products, such as the Gen 2 Mobile Connector.
Mobile Connector Status Lights & Troubleshooting
The Tesla Gen 3 Mobile Connector features a row of LED status lights on the controller that indicate operating status, charging progress, and fault conditions. Under normal operation, the green LEDs illuminate sequentially while charging, and the red LED remains off. If a fault occurs, the red LED flashes in different patterns to help identify the problem.
| Green LEDs | Red LED | Operating Condition | Recommended Action |
| All LEDs illuminate for 1 second | Off | Startup self-test | Wait until initialization completes. |
| Top green LED only | Off | Power available; charger is on standby | Connect the charging handle to the vehicle. |
| Green LEDs streaming | Off | Charging normally | No action required. |
| Green LEDs streaming | Continuous flashing | Charging current reduced due to high temperature at the vehicle connector | Disconnect and reconnect the connector. Charge in a cooler location if possible. |
| Green LEDs streaming | 3 flashes | Charging current reduced due to high controller temperature | Improve ventilation or reduce ambient temperature. |
| Green LEDs streaming | 4 flashes | Charging current reduced due to excessive wall plug temperature | Inspect the receptacle and plug for loose or damaged connections. |
| Green LEDs streaming | 5 flashes | Adapter fault detected | Remove and reinstall the outlet adapter securely. |
| No green LEDs | Continuous flashing | Ground fault detected | Disconnect the charger, inspect the circuit, and try another properly grounded outlet. |
| No green LEDs | 2 flashes | Ground continuity lost | Verify proper equipment grounding and receptacle wiring. |
| No green LEDs | 3 flashes | Internal relay fault | Disconnect and reconnect the charger. If the fault persists, contact Tesla Service. |
| All green LEDs on | Solid red | Over-voltage or under-voltage detected | Verify the supply voltage and outlet condition before charging. |
| No green LEDs | 6 flashes | Communication fault between the charger and vehicle | Disconnect and reconnect the charging handle. |
| No green LEDs | 7 flashes | Software mismatch or internal software error | Update the vehicle software. Contact Tesla if the issue continues. |
| No green LEDs | Solid red | Internal Mobile Connector fault | Disconnect the charger from both the vehicle and receptacle, then reconnect. Replace or service the unit if necessary. |
| All green LEDs on | Continuous flashing | Charging stopped due to excessive temperature at the vehicle connector | Allow the connector to cool before charging again. |
| All green LEDs on | 3 flashes | Charging stopped due to controller overheating | Allow the controller to cool and improve ventilation. |
| All green LEDs on | 4 flashes | Charging stopped due to excessive wall plug temperature | Inspect the receptacle, terminals, and wiring for loose connections or overheating. |
FAQ
Can I use an extension cord with the Tesla Mobile Connector?
No. Tesla specifically prohibits using extension cords, multi-outlet adapters, conversion plugs, or power strips with the Mobile Connector because they may overheat and create a fire or shock hazard.
Does the Mobile Connector automatically select the charging current?
Yes. Each Tesla outlet adapter contains identification circuitry that allows the Mobile Connector to recognize the adapter and automatically set the appropriate maximum charging current.
Can I leave the Mobile Connector plugged into the outlet?
Yes. Tesla recommends leaving the Mobile Connector plugged into the wall receptacle between normal daily charging sessions to reduce wear on the outlet contacts. Unplug it only if it will not be used for an extended period or before transporting it.
Does the Mobile Connector require ventilation?
No. The Gen 3 Mobile Connector is designed for charging vehicles that do not require external ventilation during charging, and the unit itself does not require ventilation under normal operating conditions.
Can I use the Mobile Connector outdoors?
Yes. The controller enclosure is rated Type 4X, making it suitable for outdoor use when connected to a properly installed receptacle. However, avoid submerging the equipment or allowing water to enter the receptacle or connectors.
Does a J1772 adapter reduce charging speed?
No. The adapter itself does not reduce charging speed. Charging power depends on the Tesla Mobile Connector, the electrical circuit, and the vehicle’s onboard charger.
Can I use the Tesla Mobile Connector to charge any J1772 EV?
Most North American EVs and PHEVs equipped with a SAE J1772 inlet can be AC charged using a compatible NACS-to-J1772 adapter. Always verify compatibility with the vehicle manufacturer and the adapter manufacturer.
Can I use a J1772 adapter with Tesla Superchargers?
No. Standard NACS-to-J1772 adapters are intended for AC Level 1 and Level 2 charging only and are not compatible with Tesla Superchargers or other DC fast chargers.
Will the Mobile Connector automatically adjust the charging current?
Yes. The Mobile Connector automatically detects the installed Tesla outlet adapter and limits the maximum charging current accordingly, regardless of whether it is charging a Tesla vehicle or a J1772-equipped EV.
Disclaimer:
The author will not be liable for any losses, injuries, or damages from the display or use of this information or if you try any circuit in wrong format. So please! Be careful because it’s all about electricity and electricity is too dangerous. If you are unsure, contact a licensed electrician to do it according to the local area codes.
Resources:
EV Charger Wiring Series
- How to Wire a Tesla Wall Connector & Universal EV Charger
- How to Wire AC Level 2 EV Smart Breaker Charger – 40A/32A
- How to Wire an EV Wall Charger – Hardwired and Plug-in
- How to Wire ChargePoint Home Flex Charger for Every EV
- How to Wire Smart Electric Vehicle Charging Station – 32A/80A
- How to Wire 48A Level 2 Dual Port EV Charging Station
Smart Devices Wiring Series
- How to Wire a Smart Switch in a 120/240V Load Center
- How to Wire 120/240V Smart Load Center with Smart Breakers
- How to Wire a Smart Breaker in a Smart 120/240V Panel
- How to Wire a Smart GFCI Breaker in a 120/240V Smart Panel
- How to Wire Smart AFCI/GFCI Breaker in a Smart Load Center
- How to Wire a 15A Wi-Fi Smart Outlet in a Smart Panel
- How to Wire 15A and 20A Wi-Fi Smart GFCI Outlets
- How to Wire Z-Wave Smart Switch, Dimmer & Fan Speed Controller
- How to Wire a Digital and Wi-Fi Smart LED Dimmer Switch
- How to Wire a Smart Switch Companion with a Smart Switch
- Wiring a Smart Dimmer Switch Companion with a Digital Dimmer
- How to Install a Wire-Free Smart Dimmer Anywhere Companion
- How to Wire Smart Scene Controller Switch
- How to Install a Wireless Smart Scene Switch
- How to Install a Wake and Sleep Wireless Smart Switch
- How to Wire a Smart Motion Sensing Dimmer Switch
- How to Wire a Combo Humidity Sensor & Fan Control with Light Switch
- How to Wire Humidity Sensor and Fan Control Switch
- How to Wire a Countdown Timer Switch – 15 Mins to 12Hrs
Wiring Standard GFCI & Breakers
- How to Wire a 1-Pole Breaker
- How to Wire a 2-Pole Breaker
- How to Wire a 3-Pole Breaker
- How to Wire a 1-Pole GFCI
- How to Wire a 2-Pole GFCI
- How to Wire a 3-Phase, 3-Pole GFCI
- How to Wire a Tandem Breaker
- How to Wire GFCI Circuit Breakers
- How to Wire an AFCI Breaker
Main Panels Wiring Tutorials
- How to Wire 120V/240V Main Panel? Breaker Box Installation
- How to Wire 120/240V Smart Load Center with Smart Breakers
- How to Wire 208V/120V, 1-Phase & 3-Phase Main Panel?
- How to Wire 240V, 208V & 120V, 1 & 3-Phase, High Leg Delta Main Panel?
- How to Wire 277V/480V, 1-Phase & 3-Phase Main Service Panel?
- How to Wire a Subpanel? Main Lug Installation for 120V/240V
- Single Phase Electrical Wiring Installation in Home according to NEC & IEC
- Three Phase Electrical Wiring Installation in Home – NEC & IEC
- How To Wire a Single Phase kWh Meter – 120V/240V
- How to Wire a Three-Phase Meter? 120/208/240/277/347/480/600V
- How to Wire Spa Panel for Hot Tub using 2-P GFCI & Breaker
Wiring General Outlets & GFCI/AFCI Receptacles
- How to Wire an Outlet Receptacle? Socket Outlet Wiring Diagrams
- How to wire a GFCI Outlet?
- How to Wire an AFCI Outlet?
- How to a Wire 3-Way Combination Switch and Grounded Outlet?
- How to Wire a 15A – 125V Outlet – NEMA 5-15 Receptacle
- How to Wire a 20A – 125V Outlet – NEMA 5-20 Receptacle
- How to Wire a 15A – 250V Outlet – NEMA 6-15 Receptacle
- How to Wire a 20A – 250V Outlet – NEMA 6-20 Receptacle
- How to Wire a 30A – 250V, NEMA 6-30 Receptacle
- How to Wire a 50A – 125/250V Outlet – NEMA 14-50 Receptacle for EVs
Sizing Breakers, Wires & Panels
- How to Size a Load Center, Panelboards and Distribution Board?
- How to Determine the Right Size Capacity of a Subpanel?
- How to Find the Right Wire Size for 100A Service 120V/240V Panel?
- How to Size a Circuit Breaker?
- How to Find the Proper Size of Wire & Cable In Metric & Imperial Systems
- How to Size a Breaker and Wires in AWG with EGC for Load?
- How to Size Service-Entrance Conductors and Feeder Cables?
- How to Size Feeder Conductors with Overcurrent Protection
- How to Size a Branch Circuit Conductors with Protection?
- How to Size Equipment Grounding Conductor (EGC)?
- How to Size Grounding Electrode Conductor (GEC)?
- How to Size Main Bonding Jumper (MBJ)?
- How to Size Motors FLC, HP, Voltage, Breaker Size and Wire Size
- What is the Correct Wire Size for 100A Breaker and Load?
- What is the Right Wire Size for 15A Breaker and Outlet?
- What is the Suitable Wire Size for 20A Breaker and Outlet?