Staircase Wiring Diagram – How to Control a Lamp from Two Places?
How to Control One Lamp from Two Different Locations using 2-Way & 3-Way Light Switches?
In today’s basic electrical wiring installation tutorial, we will discuss the step-by-step method of staircase wiring installation using SPDT (Single Pole Double Throw) switches, also known as 3-way switches (US) or 2-way switches (UK).
Two Way Switch or Three Way Switch
The same wiring circuit diagram can be used for 2-way or 3-way lighting circuits or for controlling electrical appliances from two or more different locations using two-way and three-way switches. The main purpose of a two-way switching circuit is that the appliances can be turned on or off independently from any switch, regardless of the switch’s current position (either on or off).
Related Wiring Diagram:
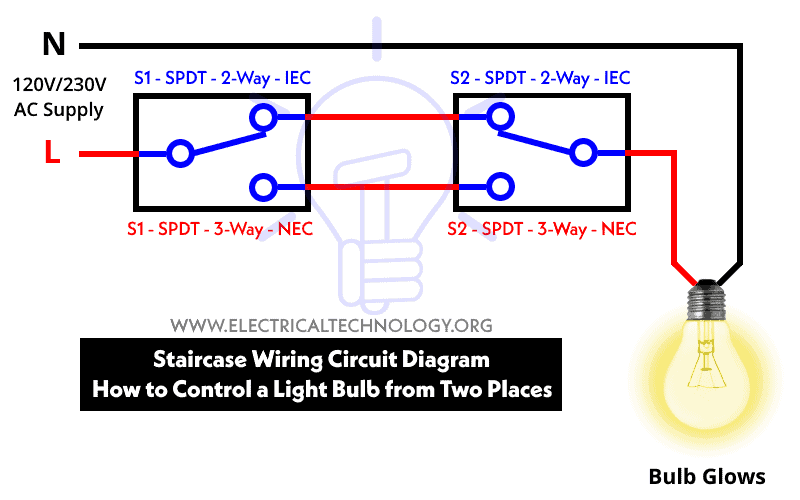
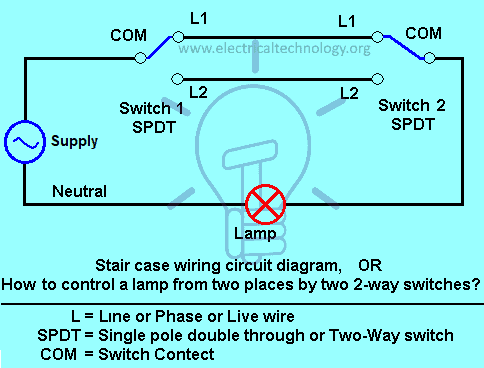
Staircase Wiring Circuit Diagram – Controlling a Bulb from Two Places
Below is a traditional staircase wiring circuit diagram. Here we can control a light bulb from two different places using two 2-way switches.

Working & Operation of Staircase Wiring – 2-Way & 3-Way Light Switching
Consider the above 2-way switch wiring diagram which has been used to control a bulb in staircase. The schematic shows that circuit is completed and bulb is ON. Suppose you want to OFF the bulb from the upper switch at top of stair ( (upper portion of staircase) ) simply Switch OFF the switch then circuit will break and the bulb will be OFF. To switch ON the bulb again, just switch ON the same switch at upper portion of staircase. In other words you can OFF and ON bulb from upper switch at the top of stair. Obviously; you can perform the same operation from the bottom switches installed in staircase.
Related Posts:
- How to Wire Single Pole, Single Throw (SPST) as 2-Way & 1-Way Switch? IEC & NEC
- How to Wire Single Pole, Double Throw (SPDT) as 3-Way & 2-Way Switch? IEC & NEC
Now, let’s see how we can do that from the other switch installed at the bottom of stair.
Working & Operation of Staircase Wiring – 2-Way & 3-Way Light Switching
Consider the 2-way switch wiring diagram used to control a bulb in a staircase. The schematic shows the circuit is complete, and the bulb is on. If you want to turn off the bulb from the switch at the top of the stairs, simply turn off the switch, breaking the circuit, and the bulb will turn off. To turn the bulb on again, just turn on the same switch at the top of the stairs. You can perform the same operation from the switch at the bottom of the stairs.
Now, let’s see how we can do this from the switch at the bottom of the stairs.
In this case, if you want to turn off the bulb from the switch at the bottom of the stairs, simply turn off the switch, breaking the circuit, and the bulb will turn off. You can turn the bulb on again by turning on the same switch at the bottom of the stairs.
Controlling a Light Bulb in Staircase Wiring from Two Different Locations Using 3-Way Switches

Controlling a Light Bulb in Staircase Wiring from Two Different Locations Using 2-Way Switches

To achieve the switching position for the light bulb to be on, the operation is the same as the Exclusive-NOR (X-NOR) logic gate truth table shown below.
| Switch 1 | Switch 2 | Lamp Position |
| 0 = OFF | 0 = OFF | 1 = ON |
| 0 = OFF | 1 = ON | 0 = OFF |
| 1 = ON | 0 = OFF | 0 = OFF |
| 1 = ON | 1 = ON | 1 = ON |
Related Posts:
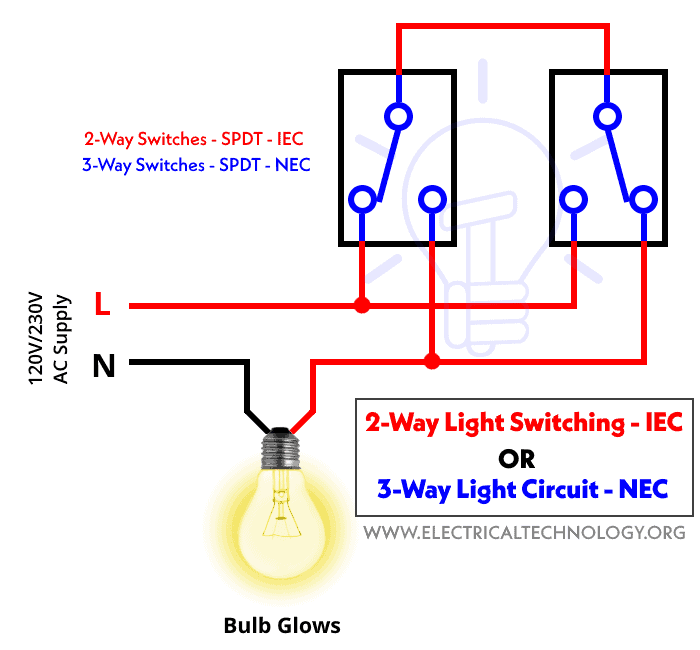
Two Way Switching using Three Wires
The new 2-way switching connection method can be used for staircase wiring. It is more efficient compared to the traditional method, using three wires instead of two.
In this new method, the current position of the 2-way switching connection using a three-wire circuit is on, and the bulb is glowing. The circuit operation is the same as mentioned above, but the connection method is different. The first terminals of both switches are connected to the live (phase) wire. The second terminals of both switches are connected to the bulb to provide a live line supply, while the neutral is directly connected to the bulb, as in common wiring methods.
This basic circuit can be a bit confusing at first glance, as it may appear to create a short circuit when both switches are on or off, forming a loop that disconnects the live supply to the bulb. Hence, the bulb will not glow in that case.
To achieve the switching position for the light bulb to be on, the operation is the same as the Exclusive-OR (X-OR) logic gate truth table shown below.
| Switch 1 | Switch 2 | Lamp Position |
| 0 = OFF | 0 = OFF | 1 = OFF |
| 0 = OFF | 1 = ON | 0 = ON |
| 1 = ON | 0 = OFF | 0 = ON |
| 1 = ON | 1 = ON | 1 = OFF |
Related Posts:
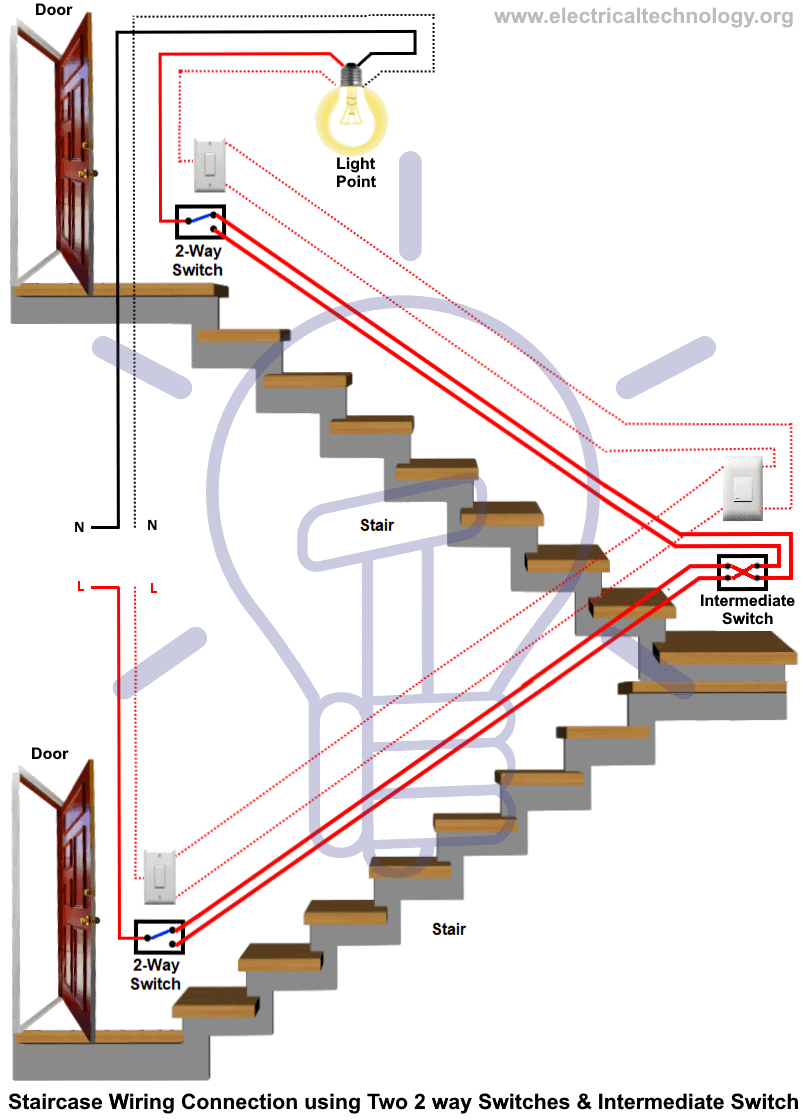
Staircase Wiring Using Intermediate Switch (4-Way Switch)
In some cases, like shared flats and long stairs, we may need to control the light point in staircase wiring from three different places using two 2-way switches and an intermediate switch, as shown in the figure below.
Click image to enlarge
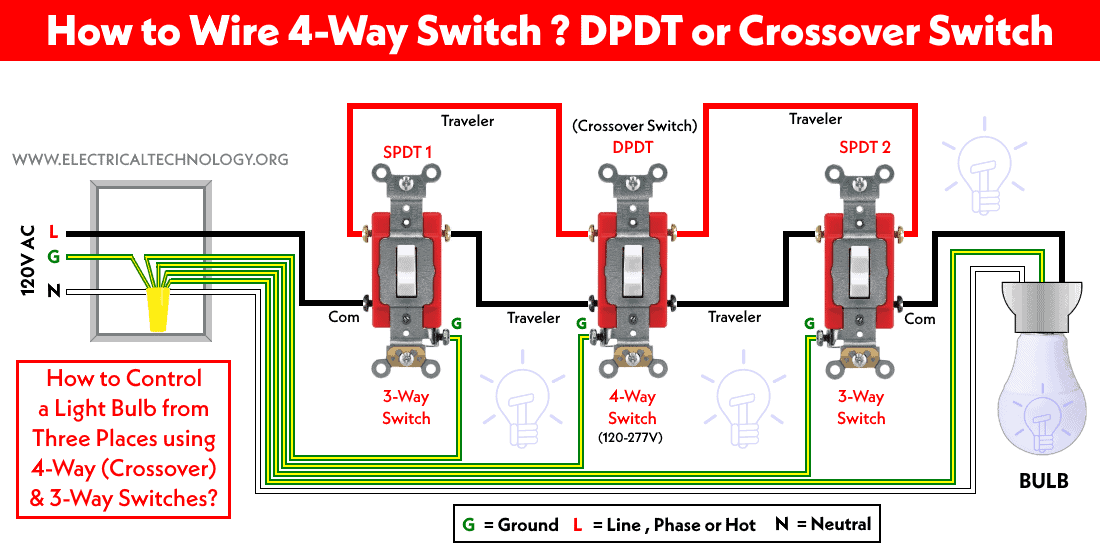
The following wiring diagram shows the same wiring configuration to control a light point from three different locations for both IEC and NEC codes.
Controlling a Light Bulb in Staircase Wiring from Three Different Locations Using a 4-Way Switch and 3-Way Switches
Click image to enlarge
Controlling a Light Point in Staircase Wiring from Three Different Locations Using 3-Way Switches and 2-Way Switches
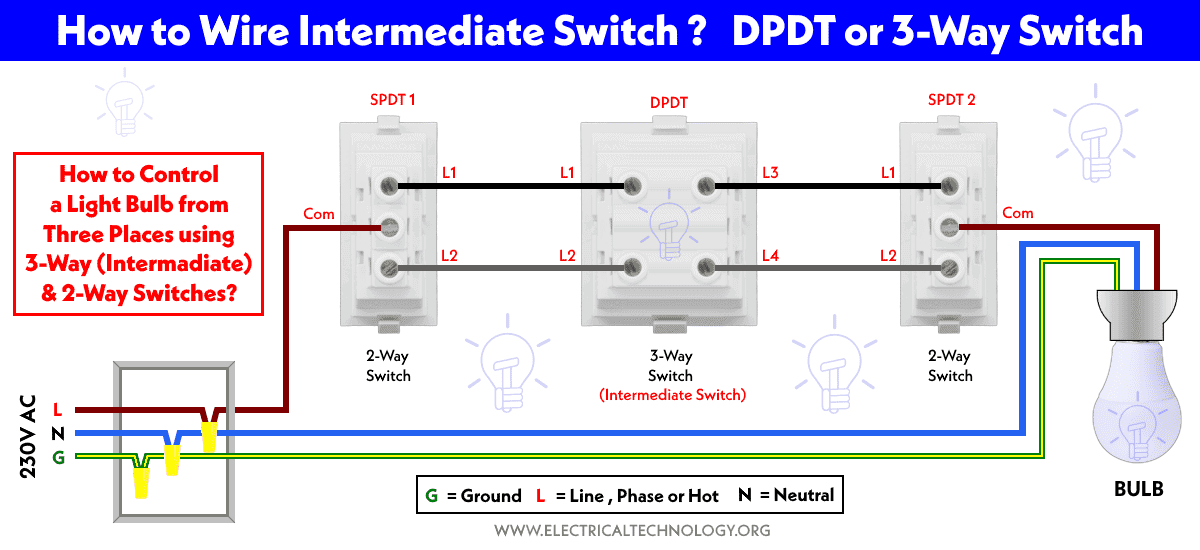
Below is the same wiring diagram showing how to control a light point (lamp) from three different places using two 2-way switches and one intermediate switch.

Related Posts:
- How to Control a Lamp by a Single Way or One-Way Switch?
- How to control each lamp by separately switch in parallel lighting circuit?
Staircase Wiring Circuit Using Smart Switch
In the latest post on how to wire a smart switch, we show that the same light bulb can be controlled using a smart Wi-Fi and RF switch relay circuit, along with RF switch panels, as shown in the following wiring diagram.
Click image or open in a new tab to enlarge

As shown in the figure, the circuit doesn’t need additional wires. Just connect the light bulb to the smart switch relay circuit and install two RF panel pushbuttons or rocker switches. This way, the on/off operation of the light can be controlled using a mobile app via Wi-Fi, remote switches via RF panels, or voice recognition technology such as Alexa and Google Home Assistant.
2-Way & 3-Way Switching Applications
- The main purpose of two-way or three-way switching is to connect and control home appliances and equipment from two separate locations.
- It is mostly used in staircase wiring, where a light bulb can be controlled (switched on/off) from different places, regardless of whether you are at the top or bottom of the stairs. The position of the switches does not matter; you just press the switch button to turn the light on or off.
- It is also used in rooms, halls, and large areas with two entry and exit points.
- It can be used to control any electrical (AC or DC) appliance or equipment, such as fans or light bulbs, from two different places.
- Some of the applications include hallway wiring, Hostel wiring, hospital wiring, tunnel wiring, and godown wiring.
Safety Precautions:
- Always turn off the power at the main circuit breaker or fuse box before starting any electrical work. Double-check that the power is off by using a voltage tester or multimeter.
- Ensure you use insulated tools designed for electrical work to reduce the risk of electric shock.
- Wear appropriate personal protective equipment (PPE) such as safety goggles, insulated gloves, and non-conductive footwear.
- Carefully follow wiring diagrams and instructions to avoid incorrect connections, which can lead to short circuits or electrical fires.
- Always assume wires are live until you have confirmed they are not. Use a voltage tester to ensure wires are not carrying electricity.
- Avoid working in wet or damp conditions to prevent electrical shock. If you must work in such conditions, take extra precautions to ensure safety.
- Ensure all wires are properly insulated and that connections are secure to prevent exposure to live wires.
- Clearly label wires and circuits to avoid confusion and ensure proper connections.
- Do not overload electrical circuits by connecting too many devices. This can cause overheating and potentially start a fire.
- If you are unsure about any aspect of electrical work, seek help from a qualified electrician. Electrical work can be dangerous if not done correctly.
- Maintain a tidy work area to avoid accidents. Keep flammable materials away from electrical components.
- The author will not be liable for any losses, injuries, or damages resulting from the display or use of this information or any attempt to implement a circuit in the incorrect format. Therefore, exercise caution, as working with electricity poses inherent risks.
Related Posts:
- How to Wire an Outlet Receptacle? Socket Outlet Wiring Diagrams
- How to Find the Number of Outlets on a Single Circuit Breaker?
- How to Find Voltage & Ampere Rating of Switch, Plug, Outlet & Receptacle
- How to Wire a Pilot Light Switch? Wiring of 2 & 3 Way Neon Light Switches
- How to Wire Combo Switch and Outlet? – Switch/Outlet Combo Wiring Diagrams
- How to Wire an AFCI Combo Switch – AFCI Switch Wiring Diagrams
- How to Wire GFCI Combo Switch and Outlet – GFCI Switch/Outlet Wiring Diagrams
- How to Control Water Heater using Switches?
- How to Wire a Ceiling Fan? Dimmer Switch and Remote Control Wiring
- How to Wire Auto & Manual Changeover & Transfer Switch – (1 & 3 Phase)
- Automatic Bathroom Light Switch Circuit Diagram and Operation
- Staircase Wiring Circuit Diagram – How to Control a Lamp from 2 Places by 2-Way Switches?
- 2 Way Switch – How to Control One Lamp From Two or Three Places?
- How to Control One Light Bulb from Six Different Places using 2-Way & Intermediate Switches?
- Corridor Wiring Circuit Diagram – Hallway Wiring using 2-Way Switches
- Hospital Wiring Circuit for Light Control using Switches
- Godown Wiring Diagram -Tunnel Wiring Circuit and Working
- Hostel Wiring Circuit Diagram and Working
- Tunnel Wiring Circuit Diagram for Light Control using Switches
- How to Wire a UK 3-Pin Plug? Wiring a BS1363 Plug
- How to Wire a UK 3-Pin Socket Outlet? Wiring a BS1363 Socket
- How to Wire a Twin 3-Pin Socket Outlet? Wiring 2-Gang Socket
- How to Wire Combo Switch and Outlet? – Switch/Outlet Combo Wiring Diagrams
- Switch and Push Button Symbols
- Basic Electrical Wiring Diagrams


plzz xplain this diagrams….
Ronak Patel @ OK… We will add some description and simple explanation.
thanxxx …..
hey Wasim khan plzz add description immediately yar…….
Ronak Patel@ DONE
please where can I buy the right swith to achieve
Controlling of Water Heater from Two Places using Two, 3-Way Switches
Using the following diagram, we can control an electric water heater from two different places, similar to the staircase wiring diagram where a single light bulb can be controlled from two places using three way switches.
Hi there,
You will have to use the single pole, double throw switches.
This way, you can control water heater from two or three different places
THNXXX.. BRO…
Welcome
Hello sir I am Tarun wason from bhiwani Haryana . I an looking for electrical job i am completed diploma in electrical engineering . I am very work harder i give best in my work so please give me job
i also hav a same dia. but it look diffent frm urs
Lets share with us…thanx
THE DIAGRAM SHOWS A CONDUIT ENCLOSED PVC SINGLES STYLE WIRING IN AN ENVIRONMENT THAT WOULD BE TYPICALLY WIRED WITH TWIN AND EARTH CABLE, WHICH IS SLIGHTLY DIFFERENT. I WOULD ARGUE THAT THIS DIAGRAM WOULD CONFUSE A D.I.YER.
No Dear…Don't Confuse with that kind of wring diagrams…<br />Its is not a layout…it is just a typical wiring diagram… So you can connect with earth cable..it is just showing only stair-case wiring diagram. not the whole wiring.
hy sir,my name is rao farhan am a diploma holder.now am working in dubai so i want to chang compani if you have ele tech job so plz tell me my uae exp is 3 year my number is 0552714041
that method is outdated and we now use 3core and earth run between the two 2way switches,which means there is a single run of twin and earth from the ceiling rose(that is your feed and switch wire and an earth conductor to the first 2way switch,feed to l1,switch on l2,the 2way switches are then joined by 3core and earth…doing it the way shown can be to be done in conduit
that's is not matter what kind of wire to be use 3 core or single wire the important is you know how to connect 2 way switch to ceiling rose or splicing it using electrical tape.
cool story bro, needs more dragons and shit<br />
Amazing Wiring..
sir i want to control stair bulb from 1st floor and from ground floor. 3 pin switches(at 1st floor and at ground floor) are already attached to board but i don't know how to connect wires.<br /><br />note:- there are 3 pins in the backside of the switch
Use the above Diagram
I want to know if this idea can be implemented using logic diagram or rather built in the lab using bread board, logic gates or IC's. If there is any idea, please post the dia and description<br />
Damn thanks a lot, I couldn't figure this out.
Depending upon the prerequisites, men and women can place numerous buttons in addition to <a href="http://www.retrotouch.co.uk/" rel="nofollow">screwless light switch</a> sockets on top of a utility circuit. You should do a few likely to ascertain wherever you should have these individuals previous to purchasing that.
The Diagrams are great, very informative. I just wanted to may be help clarify something with you. The switches in your diagrams are not 2way switches. they are 3way switches. There are 3 possible directions for current to go. If you go to get one from a parts store the box will also say 3 way switch. Hope this helps.
when we have two lamps and 3 two way switches how we design it
this helped me with physics homework :)
Way to spend three paragraphs talking in circles in order to explain how to use a light switch before introducing a diagram of a three way switching system & referring to it as two way.
This is the perfect way to break down this marination.
If I keep both the switch ON; will the bulb glow?
Paul:
“Three-way” is the North American term for this type of switch. Most English-speaking countries call them “two-way.” The term for the pair of wires connecting the two switches also varies: “strappers” to the Brits and “travelers” to us Yanks.
Surge wiring diagram
Thanks bro.
How work NO-NC connected contector with forward-reverse motor
Thanks for expalining
How to control a lamp in both Series and Parallel by using a one Two way Switch
plz give me a video of this project because i have to make this project
I want total conclusion about plc based staircase lightning
Awesome . ???
May i know the Drawing tool used to illustrate this.
Please sow Simple trick
Hi ADMin , can you please give sample diagram for the ff:kind regards thanks
1) lamp A is controlled by switch A, while lamp B & C controlled by switch B&C(series)
2) lamp A&C are connected in series and controlled by switch A&C, while lamp B is parallel and controlled by switch B
3) lamp A&C are controled by switch A&C, while lamp B&D are connected in series controlled by switch B&D.
Sir, I have a single light operated by two light switches.
Due to the plastering in my house I need to remove one of the light switches but still have the light operated by the other light switch.
How do I do this.
Thank you
Hi David,
Which type switch did you used? i.e. single way, two way, three way etc?
By the way, You can remove the other switch connections and use the single way switch for single light point. You can find the connection in our blog “Electrical Wiring” Section.
How to control a water heater from 2 different places using DPDT switches With neon lamp indications?
Thank you. We will post a complete tutorial on water heater installation to control it from two different places using double pole double through switches.. Stay tune.
Thank you. I was wondering what is the logic behind the staircase lighting. You solve the puzzle for me.
why would anybody use 3 wire cable if the job can be done with 2 wires? How is 3-wire (between switches) method newer and better except paying more for more copper?
Great